[Part IV] End to End Guide for heart disease prediction : Deployment with Flask
![[Part IV] End to End Guide for heart disease prediction : Deployment with Flask](https://images.unsplash.com/photo-1518364538800-6bae3c2ea0f2?crop=entropy&cs=tinysrgb&fit=max&fm=jpg&ixid=M3wxMTc3M3wwfDF8c2VhcmNofDEyfHxyb2NrZXQlMjB0YWtlJTIwb2ZmfGVufDB8fHx8MTY5MjE4NTY5N3ww&ixlib=rb-4.0.3&q=80&w=1200)
Introduction
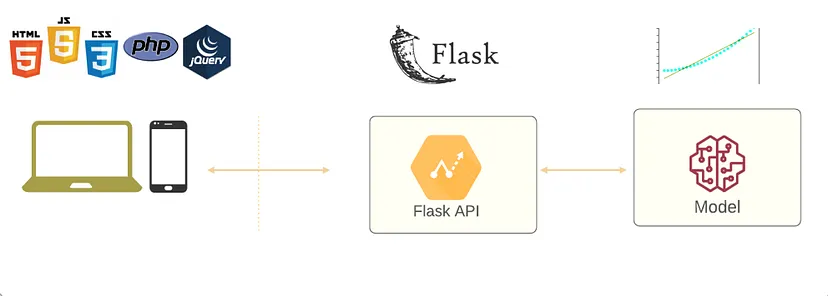
Model deployment is crucial as it bridges the gap between theoretical models and real-world applications. It enables practical utilisation of machine learning and AI solutions, delivering valuable outcomes to businesses and users. Efficient deployment ensures scalability, reliability, and accessibility, maximising the impact of AI technology in various domains.
We will choose Flask for deployment because it is a lightweight and versatile Python web framework that simplifies web application development. With its minimalistic design, it allows easy routing, templating, and integration of various components, making it a popular choice for building web applications and APIs quickly and efficiently.
So, in this article we will delve into our model deployment using flask. Before working with flask, we should download our model in pickled format and we should also make two html files for web pages; one for home page and other for result page.
Setting everything ready..
Firstly, we have to set up an environment to develop a web application that uses a deep learning model. For that we have to import required libraries.
from flask import Flask,render_template,url_for,request
import pandas as pd
import joblib
import numpy as np
import pickle
import tensorflow as tf
import keras
 model = pickle.load(open('model.pkl','rb'))
app = Flask(__name__)
We have to load the pickled machine learning model and then we should initialize the flask web application by creating an instance of the Flask class. This instance will be the foundation of our web application allowing us to define routes and handle incoming HTTP requests.
Creating the routes
A route should be defined for the root URL ('/') of your Flask web application using the @app.route() decorator. The route is associated with the home() function. When a user visits the root URL of your web application, Flask will execute the home() function, which, in turn, calls render_template('home.html').
 @app.route('/')
def home():
    return render_template('home.html')
The render_template() function is used to render an HTML template. In this case, Flask will look for a file named home.html in a folder named templates within your project directory. If the file is found, Flask will render the contents of home.htmland display it as the response to the user's request.
Also defined a route /predict with the HTTP method POST for the Flask web application. This route is intended to handle incoming POST requests, typically used when submitting a form on a web page.
@app.route('/predict',methods=['POST'])
def predict():
    if request.method == 'POST':
        # Getting input from forms
        # Preprocess features
        return render_template('result.html',prediction = my_prediction)
Inside the predict() function, you can extract data from the incoming POST request using methods. The extracted data includes various features related to a patient's condition, such as age, sex, chest pain type (cp), blood pressure etc..
The extracted data is then preprocessed, converting some categorical features to numeric representations. The data is organised into a dictionary named data, where each feature is converted into a NumPy array.
Next, the model.predict(data) line uses the loaded machine learning model (previously loaded with pickle) to make predictions on the provided data.
Finally, the result is rendered using result.html, which is another HTML template already created. This template will display the prediction made by the machine learning model.
Running on the server
 if __name__ == '__main__':
    app.run(debug=True)
The if __name__ == __main__': block is a common Python idiom that ensures the code is executed only when the script is run directly and not when it is imported as a module in another script. In the context of a Flask web application, it allows the application to start the development server and run in debug mode when the script is run directly.
When you run the Python script containing this code, the Flask application will start running on the development server, and you can access it by visiting the URL provided by the Flask server (usually http://127.0.0.1:5000/). The server will handle incoming HTTP requests and respond with the appropriate output based on the defined routes and functions. During development, it's beneficial to have debug=True enabled to facilitate debugging and faster feedback on code changes.
Results
These are the screenshots from the python script file. When executed, the first two are from the home page and the last one is from the result page.
(i) The Home Page


(ii) The Result page

Conclusion
In conclusion, deploying a heart disease prediction model in Flask offers a user-friendly web application to assess risk. By leveraging Flask's simplicity and scalability, the model can efficiently process user inputs, making real-time predictions. Careful validation and secure deployment ensure a reliable and accessible tool for health assessment.
In the next and last article of this series of blogs, we will finally explore model explainability using attention mechanism.
References
[2] https://flask.palletsprojects.com/
[3] https://www.softwaretestinghelp.com/python-flask-tutorial/
[5] https://www.geeksforgeeks.org/flask-rendering-templates/
By Maddula Syam Pavan