[Part III] End to End Guide for Heart Disease Prediction : Tracking with MlFlow
![[Part III] End to End Guide for Heart Disease Prediction : Tracking with MlFlow](https://images.unsplash.com/photo-1454165804606-c3d57bc86b40?crop=entropy&cs=tinysrgb&fit=max&fm=jpg&ixid=M3wxMTc3M3wwfDF8c2VhcmNofDZ8fHN0dWR5JTIwcmVwb3J0fGVufDB8fHx8MTY5MzE5NzAzMHww&ixlib=rb-4.0.3&q=80&w=1200)
Introduction

MLflow is an open-source platform designed to manage the machine learning models. It enables data scientists and engineers to track experiments. With components like tracking, projects, and models, MLflow allows users to organise and reproduce experiments efficiently. It supports various machine learning frameworks and cloud platforms, promoting collaboration and reproducibility in the development of machine learning models.
Integrating your model with MLflow offers several important benefits that enhance the machine learning development process and overall project management. Some key reasons are Reproducibility, Experiment Tracking, Model versioning, Collaboration, Performance Monitoring and optimization. So, we should integrate our heart disease model with mlflow.
In this article, we will delve into integrating our model with mlflow.
Tracking URI
Firstly, we should install the mlflow and import the mlflow library to gain access to all the functionalities and classes provided by mlflow.
import mlflow
 # Set the tracking URI
mlflow.set_tracking_uri('http://localhost:5000')
We have to set the tracking URI for MLflow. The tracking URI specifies the location where MLflow will store information about your machine learning experiments, including metrics, parameters, and artifacts.
In this case, the tracking URI is set to 'http://localhost:5000', which means MLflow will send and retrieve experiment information to and from an MLflow Tracking Server running on the local machine at port 5000. The Tracking Server is responsible for storing and managing experiment data and metadata, allowing multiple users to collaborate and access experiment information.
Starting a run
To start tracking we have to initiate a mlflow run.
 import mlflow
 # Start an MLflow run
mlflow.start_run()
import mlflow.keras
# Log the model architecture as a Keras artifact
mlflow.keras.log_model(model, "model")
We should import the MLflow Keras library, which extends MLflow to support Keras-specific functionalities for model tracking and logging. Then we will log the Keras model architecture as an artifact in the MLflow run. The model variable should represent your Keras model object that you want to log, and "model" is the name given to this artifact. The model architecture will be stored in the MLflow tracking backend (local file system or a central server if a tracking URI is set) as part of the experiment run.
When you log the Keras model architecture using mlflow.keras.log_model(), MLflow will capture the structure of the model, including its layers, configuration, and parameters. This allows you to easily reproduce the model later, share it with others, or deploy it to various platforms using MLflow's model deployment capabilities.
 class MLflowCallback(keras.callbacks.Callback):
    def on_epoch_end(self, epoch, logs=None):
        for metric_name, metric_value in logs.items():
            mlflow.log_metric(metric_name, metric_value, step=epoch)
We should also define a custom callback class called MLflowCallback for Keras, which is intended to be used with MLflow to log metrics during training. This callback is designed to log metrics at the end of each epoch during the model training process.
Logging
mlflow.tensorflow.autolog()
The mlflow.tensorflow.autolog() function is a convenient utility provided by MLflow to automatically log metrics, parameters, and model artifacts during TensorFlow model training without the need to write explicit logging code. This feature is part of the MLflow integration with TensorFlow and allows us to seamlessly track our TensorFlow-based machine learning experiments.
When you call the function, MLflow automatically hooks into the TensorFlow training process and captures various information, including metrics, parameters and model artifacts.
model.fit(train_ds, epochs=10, callbacks=[MLflowCallback()])
We will use model.fit() to train a machine learning model on the train_ds dataset for 10 epochs. The custom MLflowCallback() is employed as a Keras callback, automatically logging metrics and other information to MLflow during each epoch for experiment tracking and analysis.
mlflow.end_run()
mlflow.end_run() is a function in MLflow that marks the end of the current MLflow run, finalizing the logging process and closing the active run context. This ensures that all the logged data is associated with the correct run and allows you to properly manage multiple experiments in MLflow.
However, we can also log the parameters and metrics individually also without using the autolog function.
mlflow.start_run()
import mlflow.keras
 mlflow.keras.log_model(model, "model")
 class MLflowCallback(keras.callbacks.Callback):
    def on_epoch_end(self, epoch, logs=None):
        for metric_name, metric_value in logs.items():
            mlflow.log_metric(metric_name, metric_value, step=epoch)
 with mlflow.start_run(nested=True):
    mlflow.log_param("batch_size", 8)
with mlflow.start_run(nested=True):
    mlflow.log_param("opt_beta_1", 0.5)
with mlflow.start_run(nested=True):
    mlflow.log_param("opt_epsilon", 1e-06)
 accuracy = 0.7869
mlflow.log_metric("accuracy", accuracy)
model.fit(train_ds, epochs=10, callbacks=[MLflowCallback()])
Results
The following screenshots describe
i. Different ml runs and compares metrics and parameters of them.

ii. Total trainable and non-trainable parameters with autolog run.
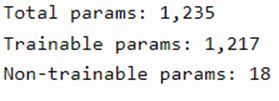
iii. Accuracy and loss graphs of autolog run respectively.


Conclusion
We got to know about MLflow and it’s importance and integrated our heart disease model with MLflow. Code is implemented such that It imports MLflow, sets the tracking URI, starts a run, logs the model architecture, creates a custom MLflow callback to log metrics, and then runs the model training for 10 epochs. It logs various parameters and metrics, such as accuracy.
In the next article we will explore Model deployment using Flask.
References
[1] https://mlflow.org/docs/latest/index.html
[2] https://www.fiddler.ai/articles/why-is-model-monitoring-important
[5]https://learn.microsoft.com/en-us/azure/machine-learning/how-to-log-view-metrics?view=azureml-api-2
By Maddula Syam Pavan